
You are standing in front of your grape vine in February, pruners in hand, staring at a wall of tangled canes you have not touched since last summer. You know you should prune. You have read that grapes need it. But nobody explained which pieces to cut and which to keep, and the vine is not cooperating by looking anything like the diagrams online.
Here is the first thing you need to know: you are going to remove roughly 90 percent of last year’s growth. That is not a typo, and it is not aggressive. An unpruned grape vine will produce dozens of small, flavorless clusters on weak wood while shading out the buds that would have given you fewer, better grapes next season. Pruning is how you direct the vine’s energy to the wood that actually fruits.
The second thing: your variety determines your pruning method. This is the mistake most beginners make. They default to spur pruning because it looks simpler, cutting last year’s canes down to short stubs along a permanent arm. For many of the varieties that succeed in the Puget Sound region, spur pruning removes exactly the wood that would have produced fruit. Those varieties need cane pruning instead.
The third thing, and the one that makes this guide different from most: in this climate, every pruning cut is a potential disease entry point. The Puget Sound lowlands receive most of their annual rainfall between November and March, which is precisely when you prune. Trunk disease pathogens release spores after as little as two hours of rainfall and infect through fresh wounds. Timing your cuts around dry weather matters here more than almost anywhere else in the country.
When to Prune
National grape pruning advice says January through March, during dormancy. That is correct in principle but dangerously broad for this region. January and February are our wettest months. A pruning wound made on a rainy January afternoon sits open and wet for days, exactly the conditions that Eutypa lata and Botryosphaeria species need to colonize the cut.
The refined window for the Puget Sound lowlands: late February through mid-March, during a dry spell, before bud swell. Check your seven-day forecast before you start. If rain is expected within 48 hours of your planned pruning day, wait.
If your vine is large and the job takes more than one session, consider the double-pruning approach used by commercial vineyards in wet climates. In December or January, make rough cuts leaving 12- to 15-inch stubs. This clears enough canopy to see the vine’s structure. Then return in late February or early March for your final, precise cuts. The rough stubs absorb most of the early-winter disease exposure, and you remove those infected stubs during the final pass.
Bud swell in this region typically begins mid-March to early April depending on variety and microclimate. If buds are already swelling and showing green tissue, you are running late. You can still prune, but work carefully; swollen buds snap off easily and those are next season’s fruit.
Know Your Wood
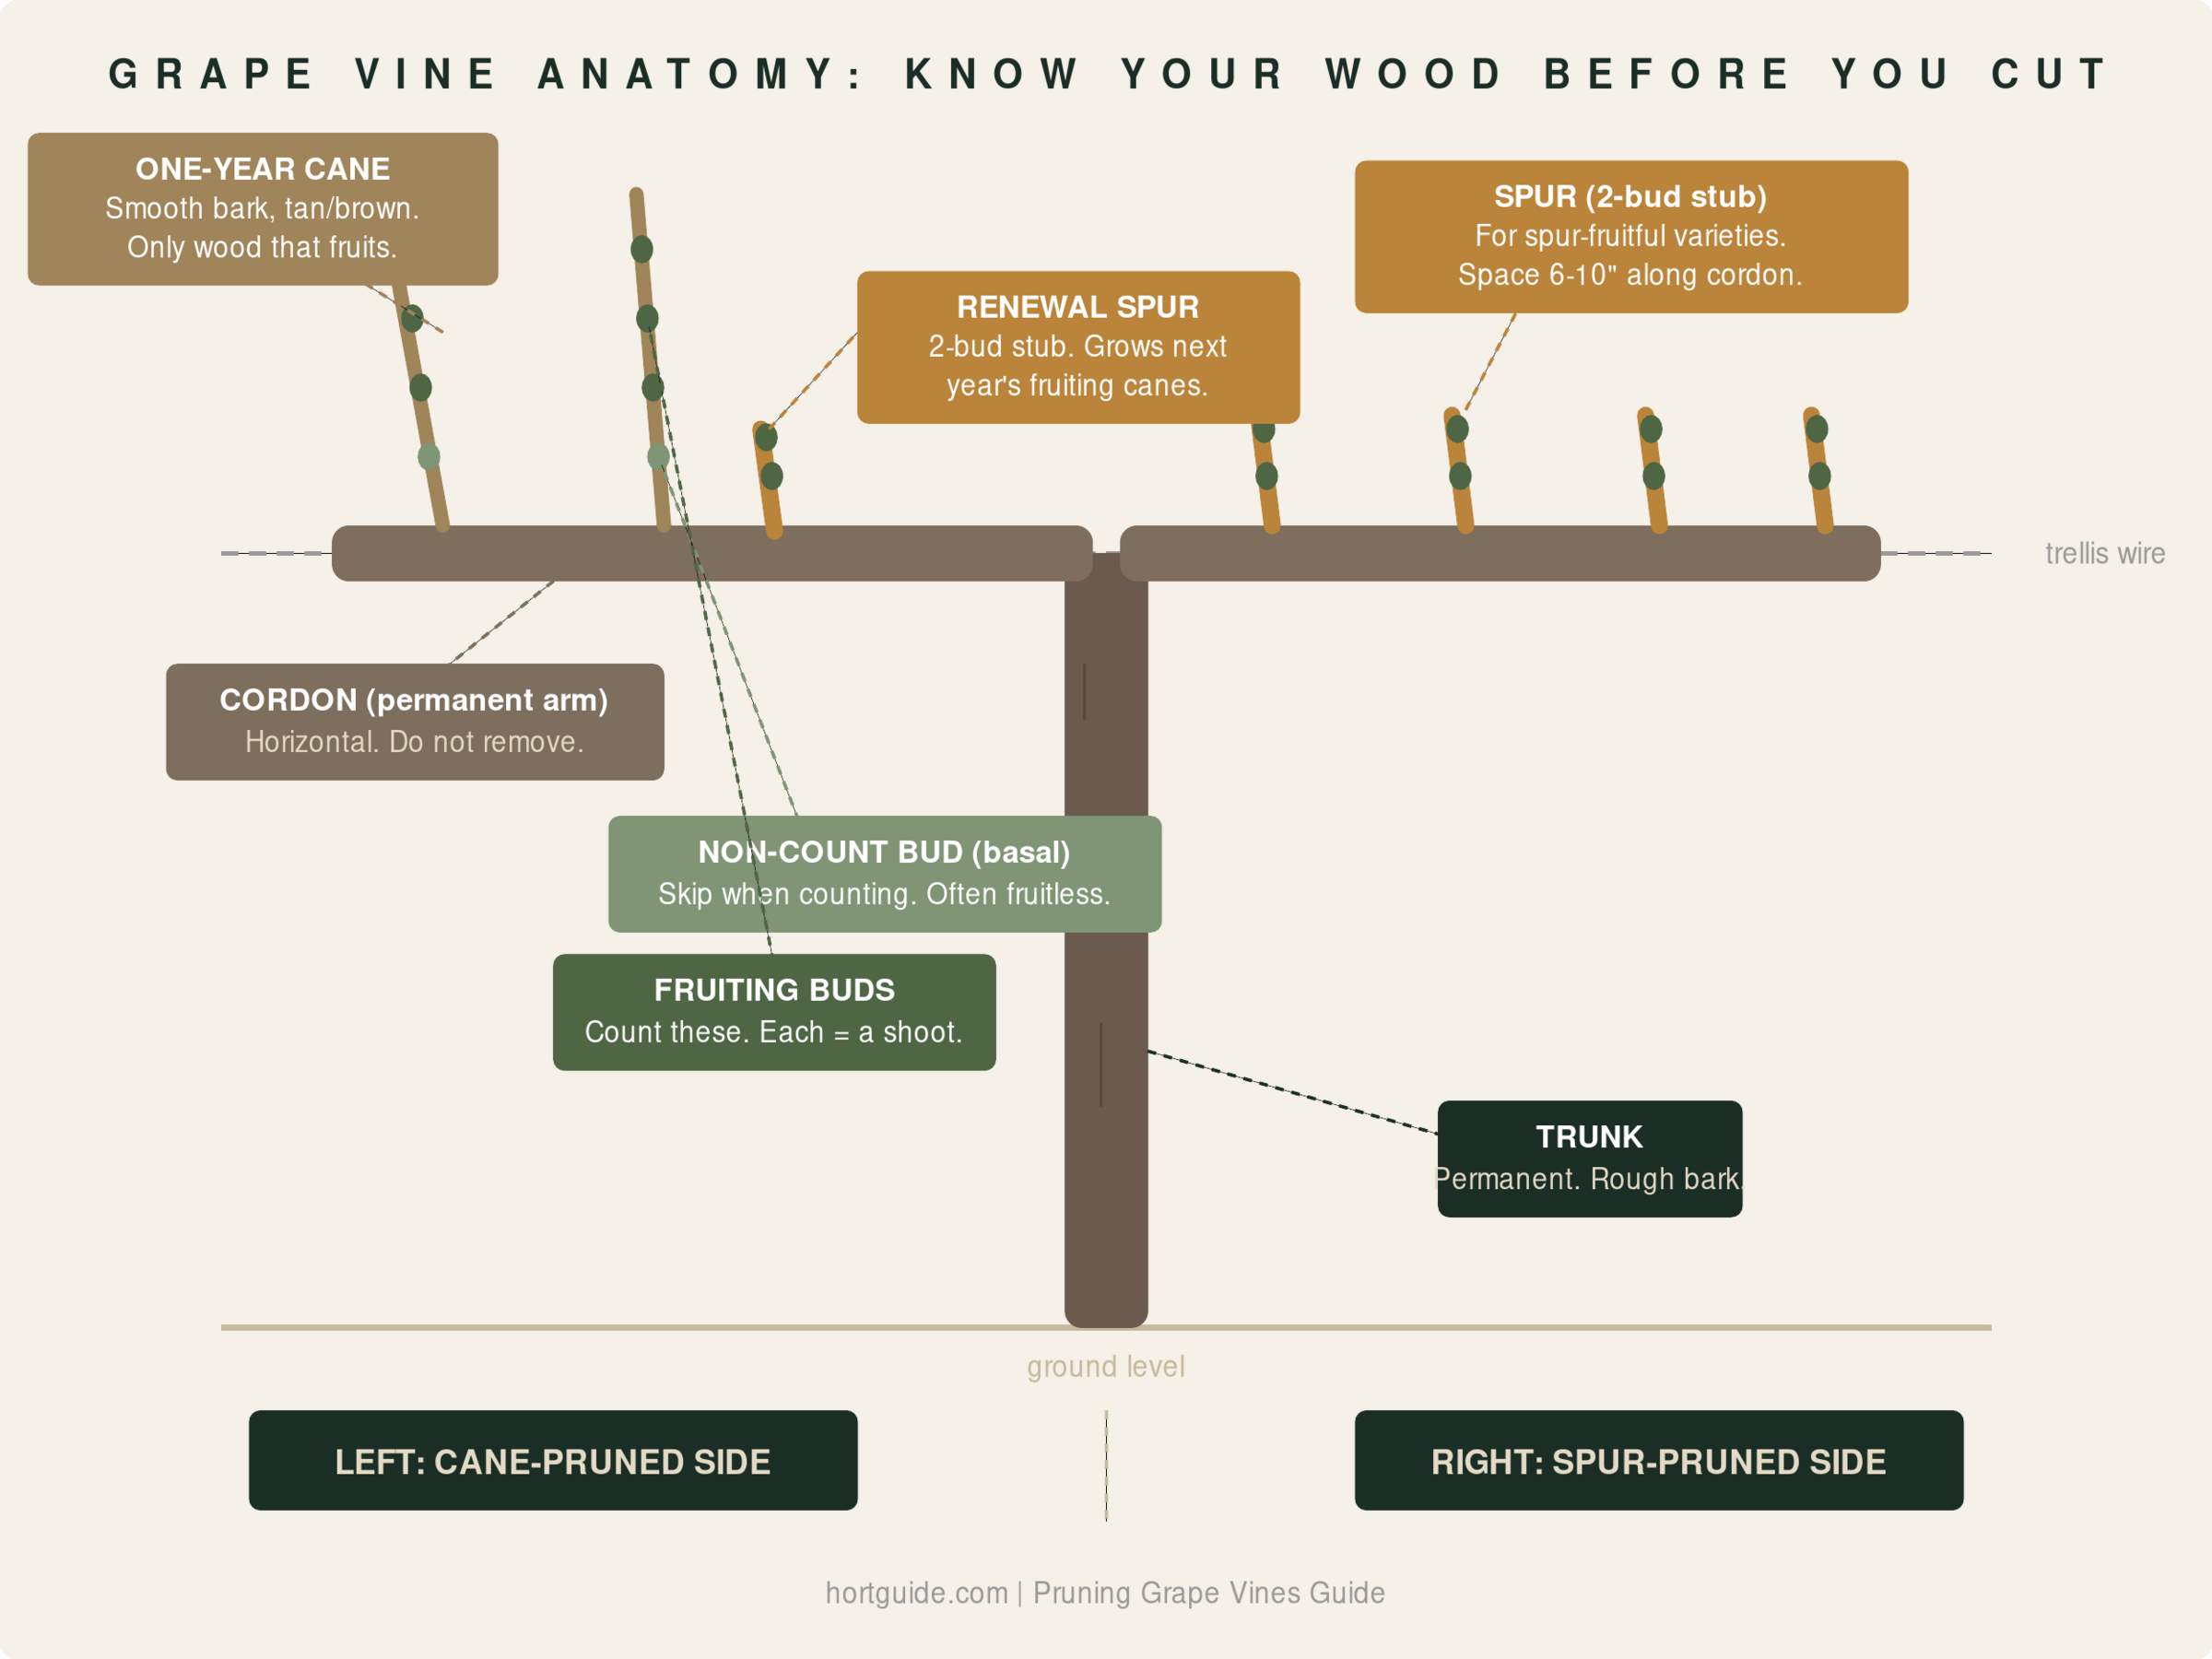
Before you make a single cut, you need to identify three types of wood on your vine.
One-year-old canes are last season’s growth. They have smooth bark, a reddish-brown or tan color, and visible buds spaced along their length. This is the only wood that produces fruit. Every pruning decision revolves around selecting or removing this wood.
Older wood (two years and up) has rougher, grayish bark that peels in strips. It forms the vine’s permanent structure: the trunk and, in cordon-trained vines, the permanent horizontal arms. You do not remove this unless it is diseased or you are replacing the vine’s framework.
The renewal spur is a short stub of one-year-old wood that you deliberately leave near the base of a fruiting cane. It grows two or three new shoots next season, giving you options for selecting next year’s fruiting canes. Renewal spurs are the mechanism that keeps the vine’s productive zone close to the trunk instead of creeping further out each year.
One piece of anatomy trips up beginners: the non-count bud at the base of each cane. It is smaller than the regular buds above it and often produces only a shoot with no fruit cluster. When you count buds for your pruning cuts, start counting above this basal bud. If a pruning guide says “leave 15 buds,” they mean 15 buds above the non-count bud.
On the moisture-retentive soils typical here, expect your one-year-old canes to be thicker and more vigorous than what national photos show. A cane the diameter of a pencil is the minimum for a good fruiting cane; many of yours will be thicker than a marker.
Spur Pruning
Spur pruning works for varieties that produce fruit on buds close to the base of a cane (positions 1 through 3). These are called spur-fruitful varieties, and the list includes Reliance, Canadice, Spartan, Lakemont, and most Vitis vinifera wine types like Pinot Noir and Chardonnay.
In a spur-pruned vine, two permanent arms (cordons) extend horizontally along the trellis wire from the top of the trunk, forming a T shape. Short stubs of one-year-old wood (spurs) are spaced every 6 to 10 inches along each cordon.
The annual pruning is simple: cut each spur back to two buds. Remove everything else. A mature vine carries 12 to 14 spur positions total, which means 24 to 28 buds after pruning. Adjust the number down for less vigorous vines, up for vines that consistently produce thick, healthy canes.
When two shoots grew from the same spur position last year, keep the one closer to the cordon and remove the other. This prevents the spurs from “walking” further away from the cordon each season.
OSU Extension’s spur pruning video walks through this step by step: How to Spur Prune Grapevines
Cane Pruning: The Cool-Climate Default
If you are growing table grapes in the Puget Sound region, this is most likely the method you need.
Most American-type grapes and American-European hybrids produce fruit on buds further out on the cane, at positions 4 through 12. If you spur-prune these varieties (cutting back to 2-bud stubs), you remove the entire fruiting zone. The vine pushes vigorous vegetative growth from those basal buds but sets little or no fruit. This is the single most common reason backyard grape growers in this region get leaves but no grapes.
The varieties that need cane pruning include Interlaken, Himrod, Lakemont (which can also be spur-pruned), Niagara, and Concord. If you are not sure which variety you have, cane prune as the safer default. It works for both cane-fruitful and spur-fruitful types, though it is slightly less efficient for varieties that fruit close to the base.
How to cane prune
Select 2 to 4 one-year-old canes that meet these criteria: at least pencil diameter, smooth bark with well-spaced buds, and originating close to the trunk or head of the vine. Avoid canes that grew from the very tip of last year’s wood; they tend to be thin and weakly attached.
Retain 10 to 15 buds per cane. For wine grapes, aim for 20 to 30 total buds on the vine. For table grapes, 50 to 80 total buds. These ranges account for the vine’s ability to ripen fruit in our limited heat-unit season; more buds than this and the vine cannot mature all the clusters before fall rain arrives.
For each cane you select, leave a renewal spur nearby: a short stub of one-year-old wood cut to 2 buds. Next year, one of the shoots from that renewal spur becomes the new fruiting cane, and the cycle continues. This is the self-renewing mechanism that keeps the vine productive indefinitely.
In frost-prone sites (low spots in the Kent valley, north-facing slopes, anywhere cold air pools), consider leaving one or two extra “kicker canes” as insurance. If a late frost kills the primary buds, the kicker canes provide backup fruiting wood. Remove them in May if the primary canes come through unscathed.
OSU Extension’s cane pruning video demonstrates the full selection process: How to Cane Prune Grapevines
Which Method Does Your Variety Need?
| Variety | Pruning Method | Type | Notes |
|---|---|---|---|
| Interlaken | Cane | Seedless table | Very early; reliable here |
| Himrod | Cane | Seedless table | Early; good fresh eating |
| Niagara | Cane | White table | American type; juice or fresh |
| Concord | Cane | Blue/purple | Needs warmest microsite; juice or jelly |
| Lynden Blue | Spur | Blue/purple | Cool-climate Concord alternative; from Mission, BC; compact vine |
| Reliance | Spur | Red seedless | Hardy; tolerates our cool summers |
| Canadice | Spur | Red seedless | Hardy; disease-resistant |
| Spartan | Spur | Red seedless | Early; compact clusters |
| Lakemont | Either | Seedless table | Flexible; spur or cane |
| Pinot Noir | Spur | Wine | Classic spur-pruned wine grape |
| Pinot Gris | Spur | Wine | Early-ripening for this region |
If your variety is not on this list and you cannot identify it, cane prune. You may sacrifice some efficiency on a spur-fruitful variety, but you will not accidentally remove all the fruiting wood the way spur pruning does on a cane-fruitful vine.
Most nurseries in Washington sell American types and hybrids suited to our shorter growing season. If you bought your vine locally and the tag is gone, the odds favor cane pruning.
Protecting Your Cuts from Trunk Disease
In drier regions, trunk disease is a slow-building background concern. Here, with 35 to 50 inches of rain falling primarily between November and March, it is an active threat every time you pick up your pruners.
The pathogens that matter most are Eutypa lata (Eutypa dieback) and several Botryosphaeria species (Bot canker). Both enter through fresh pruning wounds. Eutypa ascospores release after as little as two hours of rainfall and travel on wind currents. Once spores land on a fresh cut, infection begins. A 2023 meta-analysis published in Frontiers in Plant Science found that wound susceptibility is highest at the moment of cutting and decreases following a negative exponential curve over the following weeks; Botryosphaeria species showed consistently higher infection rates than Eutypa across all studies reviewed.
The damage is not immediate. Symptoms may take three or more years to appear: stunted spring shoots, yellowed and cupped leaves, cankers visible as wedge-shaped discoloration when you cut into the wood. By the time you see symptoms, the infection is well established. Moderately infected vines lose 19 to 50 percent of their yield. Severely infected ones lose up to 94 percent.
What you can do
Time your pruning for dry weather. This is the single most effective measure. Check the forecast and prune during a dry window of at least 48 hours. Late February and early March tend to offer the best combination of dormancy and dry weather in this region.
Prune late in the dormant season. Research from Michigan State shows that wounds made later in dormancy heal faster because the vine is closer to active growth. A cut made in late February closes more quickly than one made in December, reducing the window of vulnerability.
Apply wound sealants to large cuts. Commercial products (B-Lock, Spur Shield, Vitiseal) or Trichoderma-based biocontrol agents (Bio-Tam 2.0, Vintec) applied within 24 hours of cutting create a barrier against spore colonization. This is most practical for large cuts on the trunk or main cordons; treating every spur cut on a mature vine is usually not feasible.
Remove diseased wood aggressively. If you find cankers (look for sunken, discolored bark or wedge-shaped dark streaking when you cut into suspect wood), prune at least 4 to 6 inches below the visible edge of the discoloration. Burn or bag the removed wood. Do not drop it at the base of the vine or compost it.
Sterilize your tools. Between vines, wipe blades with isopropyl alcohol or a 10 percent bleach solution. This prevents carrying spores from an infected vine to a healthy one.
Training Young Vines (Years 1 Through 3)
New grape vines need structure before they need fruit. Rushing the first harvest weakens the vine’s framework and costs you production in years 5 through 50.
Year 1: Plant in spring. Let everything grow. The vine needs maximum leaf area to build root reserves. At the end of the first dormant season (the following late February), select the single strongest shoot and cut it back to 3 or 4 buds. Remove everything else.
Year 2: Let the new shoots grow to about 1 foot, then select the 1 or 2 most vigorous as your future trunk and trellis arms. Remove the rest. During the second dormant season, tie the selected shoots to your trellis wire and remove side shoots.
Year 3: Remove any shoots growing from the lower trunk. The vine’s permanent structure (trunk plus cordons or head) is now established. Begin your annual pruning routine: spur or cane pruning depending on variety.
Expect your first small, harvestable clusters in years 2 to 3. Full production starts around years 5 to 6. A well-maintained vine can produce for 50 to 100 years.
After You Prune
Pruning is the big event, but the follow-up work determines whether it pays off.
Watch for bud swell in the weeks after pruning. If a late frost threatens after buds have broken, drape row cover or old sheets over the vine for overnight protection. The kicker canes mentioned in the cane pruning section provide insurance for exactly this scenario.
Thin excess shoots in May and June. As the vine pushes new growth, remove crowded or poorly positioned shoots to keep the canopy open. Sunlight penetration and air circulation through the fruiting zone are your primary defenses against powdery mildew, which thrives in humid, shaded canopies.
Skip the organic mulch. This is counterintuitive for gardeners accustomed to mulching everything. Grapes want warm soil, and the clay soils common in the Puget Sound lowlands already run cool and moisture-retentive. Organic mulch cools the soil further, which is the opposite of what grapes need. Use gravel, dark-colored landscape fabric, or leave the soil bare around the base.
Thin clusters in summer if the vine set more fruit than it can ripen. If you are seeing 30 or more clusters on a vine and the individual berries are staying small, remove the weakest clusters to let the vine concentrate its energy. Quality over quantity, especially in a region where heat units are the limiting factor.
Keep notes. Record which canes produced the best clusters this year, how many total buds you left, and when the fruit ripened. Over a few seasons, these notes become your own pruning calibration data, more accurate for your specific vine and microsite than any general guide.
Seasonal Action Summary
| When | What | Why |
|---|---|---|
| Late Jan - Feb | Assess vine structure; rough-cut long stubs if double pruning | Plan your cuts. Avoid rainy days. |
| Late Feb - mid Mar | Main dormant pruning; final cuts on double-pruned vines | Dry-weather window before bud swell. Apply wound sealant to large cuts within 24 hours. |
| Mar - Apr | Monitor bud swell; frost-protect if needed | Kicker canes provide backup if frost hits after bud break. |
| May - Jun | Thin excess shoots; position remaining shoots for sunlight | Manage vigor; prevent shading of fruit zone. |
| Jul - Aug | Remove leaves around fruit clusters; thin clusters if overcropped | Air circulation reduces powdery mildew. Fewer clusters = larger, riper berries. |
| Sep - Oct | Harvest when sweetness and acidity balance; record which canes produced best | Grapes do not ripen after picking. Taste-test before you cut the cluster. Notes inform next year’s pruning decisions. |
Sources: Oregon State University Extension, “Prune Grapevines in Winter for Healthier Plants, Better Harvests” and EC 1639 “Growing Table Grapes”; OSU Extension pruning videos by Patricia Skinkis; PNW Plant Disease Management Handbook, “Grape: Eutypa Dieback”; Frontiers in Plant Science (2023), “Susceptibility of pruning wounds to grapevine trunk diseases: A quantitative analysis of literature data,” DOI 10.3389/fpls.2023.1063932; UC Davis IPM, “Training and Pruning Grapes”; Michigan State University Extension, “Preventing Grapevine Decline”; WSU Master Gardener program, “Growing Grapes in Western Washington” (Skagit County, 2024). All recommendations apply to the Puget Sound lowlands, Zone 8b. Always read and follow pesticide label directions.